How-To Instructions: Setting Up Existing and New Customers Site Logins and Passwords
1. GETTING YOUR EXISTING CUSTOMERS ONBOARDED TO THE NEW FOCUSPOINT ECOMMERCE SITE
2. CUSTOMIZING AND SENDING YOUR WELCOME MESSAGE TEMPLATE
3. UPDATING YOUR CUSTOMER SETTINGS (PASSWORDS AND SECURITY)
1. GETTING YOUR EXISTING CUSTOMERS ONBOARDED TO THE NEW FOCUSPOINT ECOMMERCE SITE
-
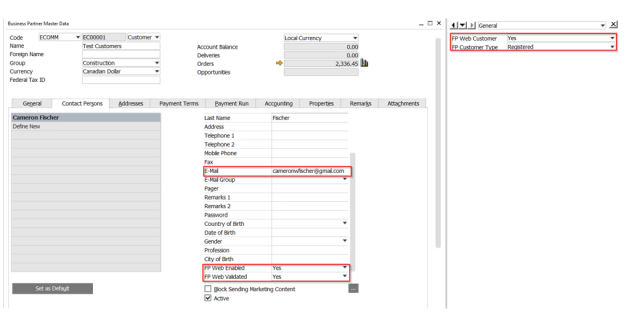
* The first step is to web-enable the Business Partner and then the Contact in SAP that should have access to the site (typically this is part of the DTW process since you most likely have a lot of BPs and contacts that will need access to shop your ecommerce site)
-
* Once web enabled, you may want to go into your FocusPoint Administration site under _Customers > Customers_ and check the Customer table to make sure they are successfully added
2. CUSTOMIZING AND SENDING YOUR WELCOME MESSAGE TEMPLATE
-
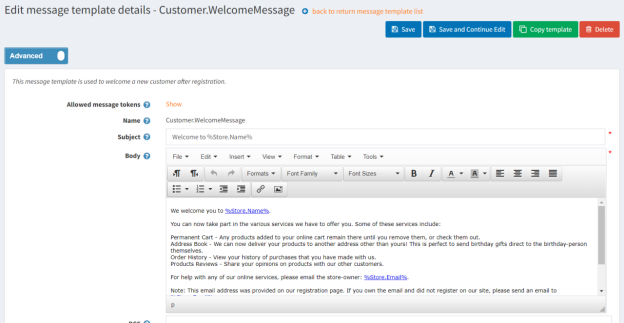
There is a Welcome Message template already set up within FocusPoint
- This can be edited/customized within the FP Admin portal by going to
- Content management > Message templates > Customer.WelcomeMessage
- Click on the ‘Edit’ button to change messaging
- Be sure that the ‘Advanced’ button is toggled at the top of the message screen when you’re Editing
- You must click the blue ‘Save’ or ‘Save and Continue Edit’ button at the top of the screen after making any changes
-
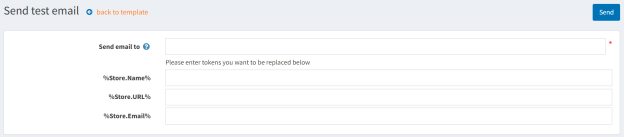
After updating your message, you can always send a Test template by clicking the orange button under the message content
- Input the email address of where the test should go to
- The tokens will automatically populate (Store Name, Store URL, Store Email)
- The tokens will automatically populate (Store Name, Store URL, Store Email)
- Input the email address of where the test should go to
-
You are now ready to send your Welcome Message
- There are three options that you can select from to send your welcome messages
- Option 1: individual customer messages (via FocusPoint)
- Option 2: bulk welcome messages to multiple customers at once (via FocusPoint)
- Option 3: bulk welcome messages to multiple customers at once (via your company’s email management system)
- There are three options that you can select from to send your welcome messages
-
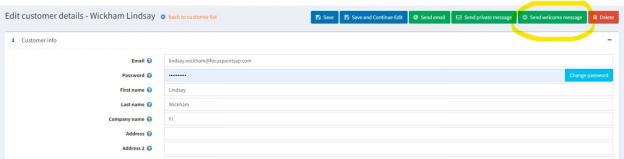
  *   OPTION 1: SEND TO AN INDIVIDUAL CUSTOMER
  *   Go to the Customer panel and click ‘Edit’ to select the individual who should receive the Welcome Message
  *   At the top of the customer profile, you will see a green button to ‘Send welcome message’
  *   Click that button to send the message to this one customer/individual
-
  *   OPTION 2: SEND BULK WELCOME MESSAGING TO MULTIPLE CUSTOMERS AT ONCE VIA FOCUSPOINT
  *   Go to the Customer panel
  *   You have the ability to select everyone visibility showing on page one of the customer table by clicking the checkbox next to the Email table header, or you can select multiple customers to receive this message
      *   _Note: You can see up to 100 customers per page on FocusPoint; that is the maximum number of individuals who can receive that message_
  *   At the very top of the page, you will see a green button that says ‘Send welcome message’
      *   Click that button to send the message to all customers that have been web enabled and on FocusPoint


-
  *   OPTION 3: BULK WELCOME MESSAGES VIA YOUR OWN EMAIL MANAGEMENT SYSTEM (best for first time ecommerce site transition):
  *   We recommend sending a bulk email from your email service (Hubspot, MailChimp, etc.) if you have a lot of customers to onboard to the new site all at one time
  *   This alleviates the need to go into each customer and select ‘Send Welcome Message’ separately for each user
  *   Create the messaging and include the URL link to your new website’s login page
      *   This page link will be labeled as Password Recovery
  *   [https://](https://insertyouruniquesiteURL.com/passwordrecovery)[**insertyouruniquesiteURL.com**](https://insertyouruniquesiteurl.com/passwordrecovery)[/passwordrecovery](https://insertyouruniquesiteURL.com/passwordrecovery)
  *   You will want to instruct your customers enter a new password; this will enable them to log into and use your new B2B site
  *   Here is an example of what you may want to create
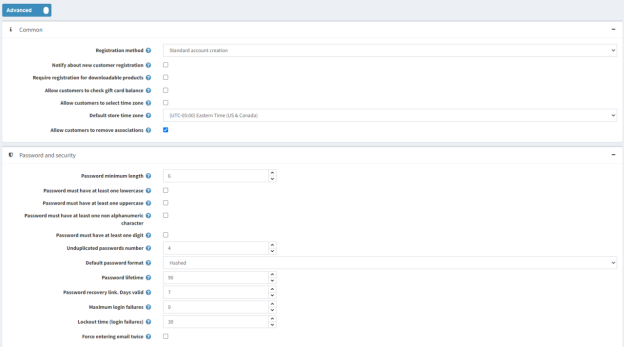
3. UPDATING YOUR CUSTOMER SETTINGS (PASSWORD AND SECURITY)
- As the store owner, you can create various settings to determine what type of information that your users will need to create upon making a password to the site
- To edit this, go to Configuration > Settings > Customer Settings and enable any of the settings you would like to—be sure to toggle to the Advanced button at the top of the page:
Was this article helpful?
That’s Great!
Thank you for your feedback
Sorry! We couldn't be helpful
Thank you for your feedback
Feedback sent
We appreciate your effort and will try to fix the article