How-to Setup a Sales Rep in FocusPoint
1. DEPARTMENT LIST (FOCUSPOINT)
2. ADDING A NEW DEPARTMENT (FOCUSPOINT)
3. ADDING EMPLOYEES (FOCUSPOINT)
4. ADDITIONAL FIELD MAPPING (FOCUSPOINT AND SAP)
5. WEB ENABLEMENT AND VALIDATION OF BPs (SAP)
6. SET UP REP CARTS (FOCUSPOINT)
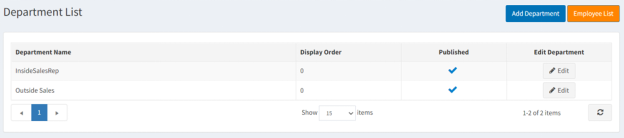
1. Department List
Department List is where all store departments are stored in FocusPoint. To manage the Department List, go to Content Management > Department List
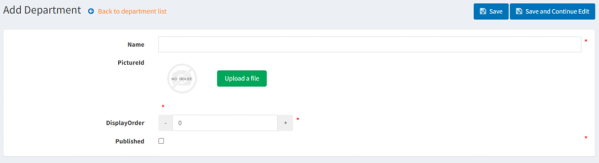
2. Adding a new Department
Click the ‘Add Department’ button
-
  *       *   Fill out Name field, i.e. Sales Reps (required)
  *   There is an option to add a PictureId to the department (not required)
  *   There is an option to set the display order in which it appears on FocusPoint
  *   To enable the department, check the box for Published
  *   Click Save at the top of the page
3. Add employees to the Employee List
The Employee List is where all sales reps are stored in FocusPoint. To manage this list, go to
Content Management > Employee List
-
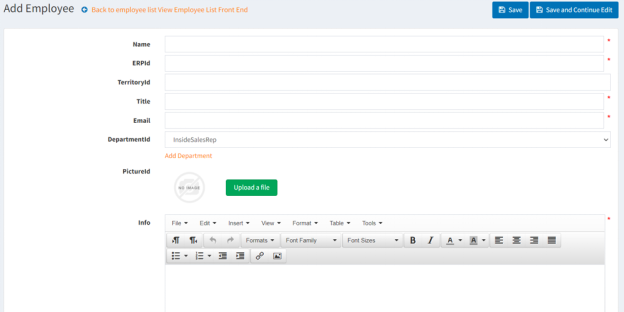
* * Click the Add Employee button to see the following details to complete:

-
* Enter Employee Name - required- Enter ERPId (Employee ID) - required
- Enter TerritoryId (if applicable)
- Enter Job Title - required
- Enter Email address - required
- Select DepartmentId from dropdown list (to learn how to create a department list, click here)
- Enter additional employee info - optional
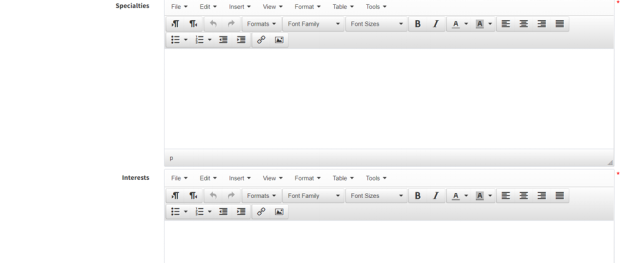
- Enter employee specialties - optional
- Enter employee interests - optional
- Enter employee phone number and mobile number - optional
- There is an option to enter date of work start and ended - optional
- Check the box for Published to have the employee displayed on the site
- Click the Save button at the top of the screen
Once your employees have been added to the Employee List, you must also add them to the Customer List.
In addition to adding a ‘Customer Role’ i.e. “Sales” or “Reps” in your Customer Role table, sales employees must be added as a customer to the customer table in FocusPoint.
a. After adding your sales/reps to the customer list, be sure to add their designated customer role, i.e. ‘Sales’ or ‘Reps’

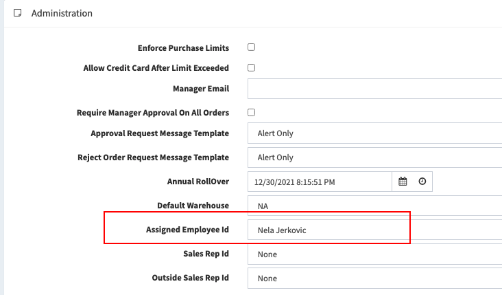
b. Assigned Employee Id - Select the Sales Rep employee’s own name from the dropdown (i.e. If you are setting up a sales rep for Customer Name select their name from the dropdown)
More information on our User Guide site: https://docs.focusedimpressions.com/employee-list
4. Additional Field Mapping is needed in SAP and FP.
To access this, you will go through SAP Integration > Additional Field Mapping and click to +Add New
FP Mapping Details
-
* SAP Field Name = SalesRepId (check in SAP first for this name)
i. Note: this field must line up to the XML field name which comes from SAP

-
* FocusPoint Field Name = SalesRepId- Entity Name = Customer
- Direction = Inbound
- Formula = SalesPersonCode
Here is what the completed field mapping information will appear after you edit the details in the new field.

Within SAP, you will go to Tools > User Defined Windows > MITI_Additional Field Mapping
SAP Mapping Details
-
* Code: Enter any number, i.e. 0001- Name: General name of the mapping information field
- Integration Direction: SAP 2 FP
- Mapping Object: Business Partner Header
- Field Type: Spring
- Enable Rule: this should be checked
- Additional Expenses ID: leave blank
- Addition Field ID: SalesRepId (Validate name per customer)
- Addition Field Map To: SalesPersonCode

5. Web Enablement and Validation of BPs
a. In SAP, you must also Web Enable and Web Validate any of the BP’s that you want their Sales reps to be able
i. Contacts within BPs must have email addresses in order to web-value and web-enable as “Yes” and push over to FocusPoint
6. Set Up Rep Carts in FocusPoint
-
* Lastly, you will set the “Sales role” by going into FocusPoint 3.0.XX > Administration > Rep Settings and select ‘enable rep cart’, add ‘Sales’ to Employee Rep Role Id, and if you want to limit reps to their customers, enable the checkbox as well:
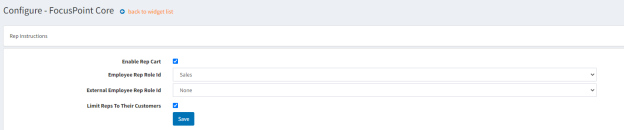
More information about rep settings can be found here: https://docs.focusedimpressions.com/focuspoint-administration-rep-settings
Was this article helpful?
That’s Great!
Thank you for your feedback
Sorry! We couldn't be helpful
Thank you for your feedback
Feedback sent
We appreciate your effort and will try to fix the article